Tuesday, March 3, 2015

Swiss Chard Enchiladas!

Jerry and I have been married 40 years.

When we were first married the vegetables we ate literally came out of our little garden and also from day old section of indoor ranch market.

Even then, I loved the challenge to cook what we had.  I read Edith Schaefer books and was inspired by the way she has always lived her life...accepted challenges to make do with what she had.

One dish I would make was Swiss Chard Enchiladas.  I really did just make it up back then.  I used big cans of Tomato Juice for sauce...it would go far.  I can't seem to find it anymore so now I use Tomato Sauce.  I always roll the chard inside softened corn tortillas.

Here we go!

Swiss Chard....It is so pretty!
It is cut up and being cleaned.
Put the ends cut up in our compost pitcher to feed our worm compost.
Start cooking the swiss chard....I just put about a 1/2 inch of water in pot as the leftover rinse water on chard also give moisture for cooking.  I cook on low heat until done.

Also, start heating the Tomato Sauce in skillet.  I am very limited on herbs and spices that I can eat, so I added parsley to the sauce.  You can add whatever you want to make it spicy to your taste.  Onions are also delicious with this..they can cook with chard, in sauce or just be saute'd in separate pan.
I softened corn tortillas in microwave and then pull them through the hot sauce to soften them more. (be careful to not burn your fingers)
Put some Swiss Chard in middle of tortilla that was swept through the sauce.  I put them one by one in 9x13 baking dish to roll them up.
Before rolling them up, I add Shredded Part Skim Mozarella Cheese on top of chard.
 So, I do fill and roll them one by one in the baking dish.

I sprinkle rest of shredded cheese on top,......
.......pour rest of Tomato Sauce over the tops or the enchiladas and let it flow over ends and onto bottom of dish so the corn tortillas will note dry out.
 Baked.....
.....and ready to eat!

we still love to eat these Swiss Chard Enchiladas......


St. Patrick's Day Dress

As I mentioned in previous post St. Patrick's T-Shirt, I was having trouble finding holiday socks to send to my two grandchildren in England .  So at last minute I went to our local Joanns Fabric store and purchased some green knit fabric to make a t-shirt and dress to send them.  I did get some socks for each of them there, but think the socks will possible be too big.

For Evie's dress/tunic I had the pattern to use and used the version you see on it as the green tunic/dress with pink heart.  I used the size 6. ....


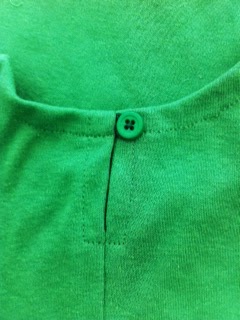
Below are some photos of the one I sewed.  I did elect to not put any four leaf clover, etc applique on it so, if Evie wants, she can wear it at other times.  The pattern was a little too short, soI had to alter it in length and think I did not do it in the right place, so, of course next one I make I will alter differently.  I do like to learn as I go.:)))


Happy St. Patrick's Day, Evie.......I love you!

St Patrick's T-Shirt

Since I do send monthly packages to my grandchildren, I have been looking for St. Patrick's Day Socks for them.  Canaan and Evie live in England so I need to allow 2 weeks shipping time for their package to arrive.

I started sending socks in the monthly packages but the ones for Valentines I sent Canaan did not fit him.  Luckily Evie's did.....I was sad that Canaan's were too big so really wanted to get the right sizes for St. Patrick's Day package. 

Well....found some but they look the same size as ones sent in February.  I got them anyway at Joann's and also decided last minute {of course:) } to make a t-shirt for Canaan and simple dress for Evie.

Joann's had some nice green knit fabric I purchased for each and got the notions required.  I already had the patterns so rushed home to wash the fabric and start sewing.  (I am a slow sewer so this was a huge challenge).

Using the pattern below for Canaan's t-shirt, I was able to complete it by late afternoon and really liked how it turned out.  I had used this pattern once before but it seemed easier this time.  View D with the long sleeve insert into the short sleeve was my choice.


 Below are some photos of the t-shirt.  It was a lot nicer looking than the photos show.  I thought the socks were cute also, but have a feeling they are too big.

I elected to not put a shamrock, etc on it so it can be worn year round.


Happy St. Patrick's Day, Canaan.....I love you

Wednesday, February 25, 2015

Blue Hat, Knitted

This past year i started taking knitting lessons at our local Michaels Crafts Store.

I had knitted in the past but really needed a tune-up on my skills.  The teacher, Mary was fabulous and with her help my confidence has grown. 

I would say I am still a beginner but did venture out to make this pretty blue hat from some yarn in my stash (that I am trying to use up).  I used a pattern from Joannes Web on You Tube
The written directions are in the "Show More" link under the video.  It is always so nice of crafters to share free patterns and "how to's".

It was a joy to make and I do plan to make more from this pattern.  It is very stretchy and fits very well.  I used a worsted weight yarn but lost the label.  I do buy Vanna White yarn often so it may be from her line of yarn.


I am thankful for crafters who share .......freely....

Monday, February 16, 2015

Crocheting and Knitting

During September and October of 2014, it was time to begin crocheting and a little knitting some items for the faires my daughter Jessica presents in.  She is ( Formerly SunnyStitching,) Her New Site is  Crochet Nature Website, Crochet Nature Facebook)

She needed the faire items by November 1 as she lives in England with her husband and 2 children (2 of my precious 5 grandchildren!) and needs time to label, price and plan the layout of her space.


Here is a photo of Jessica and her fabulous display.  She had a fabulous day of sales...but no wonder as she uses a lot of organic and eco friendly yarn and we both take care to make each piece carefully.

Jessica also donates a percentage of all sales to an organization that supports all kinds Human Slavery and Trafficking.  You will find information on her facebook page.

I love Crochet Nature!!!!!!!!!


Friday, February 13, 2015

Valentine's Pasta

This is final post about Valentine's gifts for the neighbors for Valentine's Day February 14, 2015.

The Valentine Cupcakes and French Bread were baked so time to make the Valentine's Pasta.

Now, my daughter Mary had received the Pasta Maker Kitchen Aid Attachment so she gave me her Cucina Pasta Maker.
Jerry and I used this YouTube Video to watch while we made the pasta.  We  used the recipe in the Cucina Manual for the pasta dough

 Jerry turns the lever and we pull the dough through
 We used the fettuccinni setting to make the final pasta....
 Then made each section rolled through the machine into "pasta nests""

We added a can of Hunts Original Pasta Sauce.....my son who is a chef says it is one of the BEST pasta sauces, as is or to add other ingredients to.
 We added a can of Hunts Original Pasta Sauce.....my son who is a chef says it is one of the BEST pasta sauces, as is or to add other ingredients to. (The bread is in the back of the plate wrapped in foil)

 Gift is ready for delivery....Pasta, Hunts Pasta Sauce, French Bread in foil and Valentine Cupcakes for dessert.

Jerry is on his way to their house now.....so excited...we love to give gifts.......

Valentine's French Bread

As mentioned in previous post Valentine's Cupcakes, Jerry and I were spending Friday, February 13, 2015 together baking Valentines gifts for our neighbors.

The Cupcakes were just one part of our gift.  The next part was Homemade French Bread.

We started with French Bread since it would need time to rise and we needed to make 2 loaves.  Jerry made one loaf and I made one.

We used a recipe from a friend and of course, the Kitchen Aid Artisan Mixer....to do the mixing and kneading.
If you cannot read the recipe above, and would like a copy, please email me and I weill send it to you.

I am warming up the Kitchen Aid Mixer Bowl before adding the warm water, yeast, etc.

Using a Candy Thermometer to test the warmth of the water the yeast will go in.
Jerry is getting ready to mix and knead the dough!
 (with the help of the Artisan Kitchen Aid)
 My dough being punched down and then I covered it with towel for 2nd rising.
 Jerry's dough before being punched down.
Jerry punching down that beautiful dough
 After the second rising, we each rolled out the dough to be about 15" x 4" and then rolled it up to be the loaf.
 Rolled up loaf. ...before being put back on cookie sheet for final rising.
Final rising
Picture of one of the loaves right before being put in oven to bake.
Beautiful Homemade French Bread!

See next post about the Valentine's Pasta