Monday, October 7, 2013

Christmas In July Feature for Sunshine Makings


etsy christmas in july


Jessica and I have an etsy shop called SunshineMakings.

She actually started it and I get to help her make beautiful handmade crochet items for it.

Being featured on  Etsy Christmas In July was very much a surprise and blessing for us and we want to share it.

We have crocheted some cute and pretty Christmas items, and also have great gift items as fingerless gloves, cowls, and boot cuffs.  We love to customize for you with color choices.

May this be a most lovely week for you.....


Monday, June 17, 2013

DIY Dog Door

We adopted a 12 year old poodle several years ago named Brandie.  She has been in a few of my posts.

We decided to try to train her to use a pet door but did not want to buy a new screen door with a built in pet door in case she would not use it.

We really want to get a storm screen door with a adjustable top that closes off in the winter but opens to a screen in the summer, and that has a pet door.

So, we made a pet door in our old existing screen door.........


First, Jerry took off the white wire screen door guard (not pictured) and then took the screen door off the door frame.
He then cut a rectangle opening in the bottom of the door (above).
He put silver duct tape around the sharp edges of the cut-out.
Jerry put the screen door back onto the door frame and we started trying to get Brandie to use it.
She caught on very quickly.  Her vision is getting worse so we are glad there is a low area at the bottom for her to step over.  Our next step will be to add a piece of clear lightweight vinyl to the hole and hope that she will push it to walk out.
There she goes outside............

 We love our sweet dog.....Brandie.

Sunday, June 16, 2013

Headbands

One day I decided to crochet a few headbands with some leftover yarn.

For the purple headband I used Vanna's Choice yarn that was leftover from a cowl and fingerless gloves project.....click here to see it.

I also made a turban headband to go with the cowl and gloves.  I forgot to take a photo of the turban headband but can just say that it turned out beautiful.

The purple cowl and fingerless gloves did sell at a craft show that my daughter Jessica (SunnyStitching) who live in England participated in.

I believe the turban headbands will be for sale soon along with other pretty headbands already available in our etsy store SunshineMakings ...keep an eye on the store to see when they are available.

I used this pattern for the purple headband below.
Ribbon is added to the crocheted front of the headband to tie it around the head with a pretty bow in the back that looks nice, especially if worn with a ponytail or swept up hairstyle.
 
 I knitted the grey headband using Caron Simply Soft yarn. It was a little too long so I added some buttons to make it fit snugger.  I like the color of the buttons....They are both actually the same, just look different in the lighting of the photo.
 They were a fun and quick project.

Creating with yarn when crocheting or knitting is delightful!

Friday, June 14, 2013

Great Dish Soap

I have used many dish soaps but finally found my favorite......

Seventh Generation Natural Dish Liquid, Free and Clear
Liquid Dish Soap Free & Clear 50oz.
          
    Plant-derived dish soap effectively cuts grease
Non-toxic natural dish liquid soap
Dishwashing soap that is free of dyes and synthetic fragrances
Biodegradable liquid dish soap formula

I really try to be environmentally conscious about what cleaning products I use.  The first bottle I purchased of Seventh Generation Dish Liquid lasted a long time.  It cleans our dishes, pots and pans really efficiently.  

I love using it, especially along with my newly crocheted dish cloths! (See Delightful New Dishcloths post)

Thursday, June 13, 2013

Delightful New Dish Cloths

Good bye sponges and hello to my new crocheted dishcloths.

I had been thinking about changing to crocheted or knitted dishcloths and finally decided to just make the change.
I only use the sponges for cleaning marks on floor and burnt (yes, burnt) food in pots and pans.

I had some exta Lily's Sugar N Cream Cotton Yarn,  leftover from the really pretty cup cozies available on me and my daughter Jessica's etsy store SunshineMakings.  (We have received wonderful feedback from customers who purchased these cozies.)

*Jessica also has a wonderful free patterns and creations on her SunnyStitching blog that I know you would really enjoy.*

I decided to use the extra yarn to crochet these delightful dish cloths.  I actually have made another yellow one since taking these photos.  I am pretty sure I used the Gritch Stitch Washcloth and the Back Loop Stitch patterns from Lion Brand..  I made them about 8"instead of 10" squares.

I use one for a few days and then wash it with other towels, adding a tiny bit of Ultra Downey Free and Sensitive Fabric Softener.  The dishcloths smell fresh and are soft after being dried. I like having a few extras so when one is in wash, there is a clean one to use.
Ultra Downy® Free and Sensitive liquid 
Notice my favorite dish washing liquid soap (as mentioned in upcoming post Great Dish Soap) in picture below....Seventh Generation


I have really enjoyed using them and love seeing the cheerful color when they hang over the edge of the dishdrainer.

So glad to have cheerful dish cloths in the kitchen........

Wednesday, June 12, 2013

Refreshed Tile Grout

I love the tile countertops in the kitchen and bathrooms of our home. 

Some of the grout between the tiles had worn away, especially in the kitchen.  One area, there was actually no grout left.  I decided to regrout since I do mosaics and figured it would be just like doing them.

I got advice from an associate in our local Lowe's and got started.  It was not hard at all.

First, raked out the empty areas between the tiles and raked the rest of the grout areas to clean them.

Used vacuum to blow all the dust off of the counter and wiped down with a dry rag.

Then mixed the grout and water to be like a peanut butter consistency and used my hand and a plastic spoon to fill in the areas as needed.  The associate at Lowe's suggested I get Keracolor U Unsanded Grout since the area will not be walked on.

For the grout that did not have to be replaced I recolored it white so it would match the new grout areas, using Grout Refresh.  I used a paint brush and switched to a toothbrush to put it on. I poured amounts into the plastic container.   Once it is on, the instructions say to let it sit 30-60 minutes, spray with water, let it set 5 minutes, and then wipe off the extra that gets along the edges with a sponge.


The tiles in our home are laid very very close together so I tried various rakers, a box cutter, a grout tool shaped like a hook, but decided on the grout rake (there are no photos of me using it)

First, using box cutter I scrapped all the "food particles" that had accumulataed in the cracks with no grout.
Then tried this tool to just clean other areas where there was recessed grout that needed to be filled in.  The tip of it was a little too wide to really get into the space.
  The Grout Rake was the BEST.......really cleaned areas when scrapped over existing grout before the Refresh Recolor and dug just deep enough on areas that needed new grout.  A  photo of it is below.

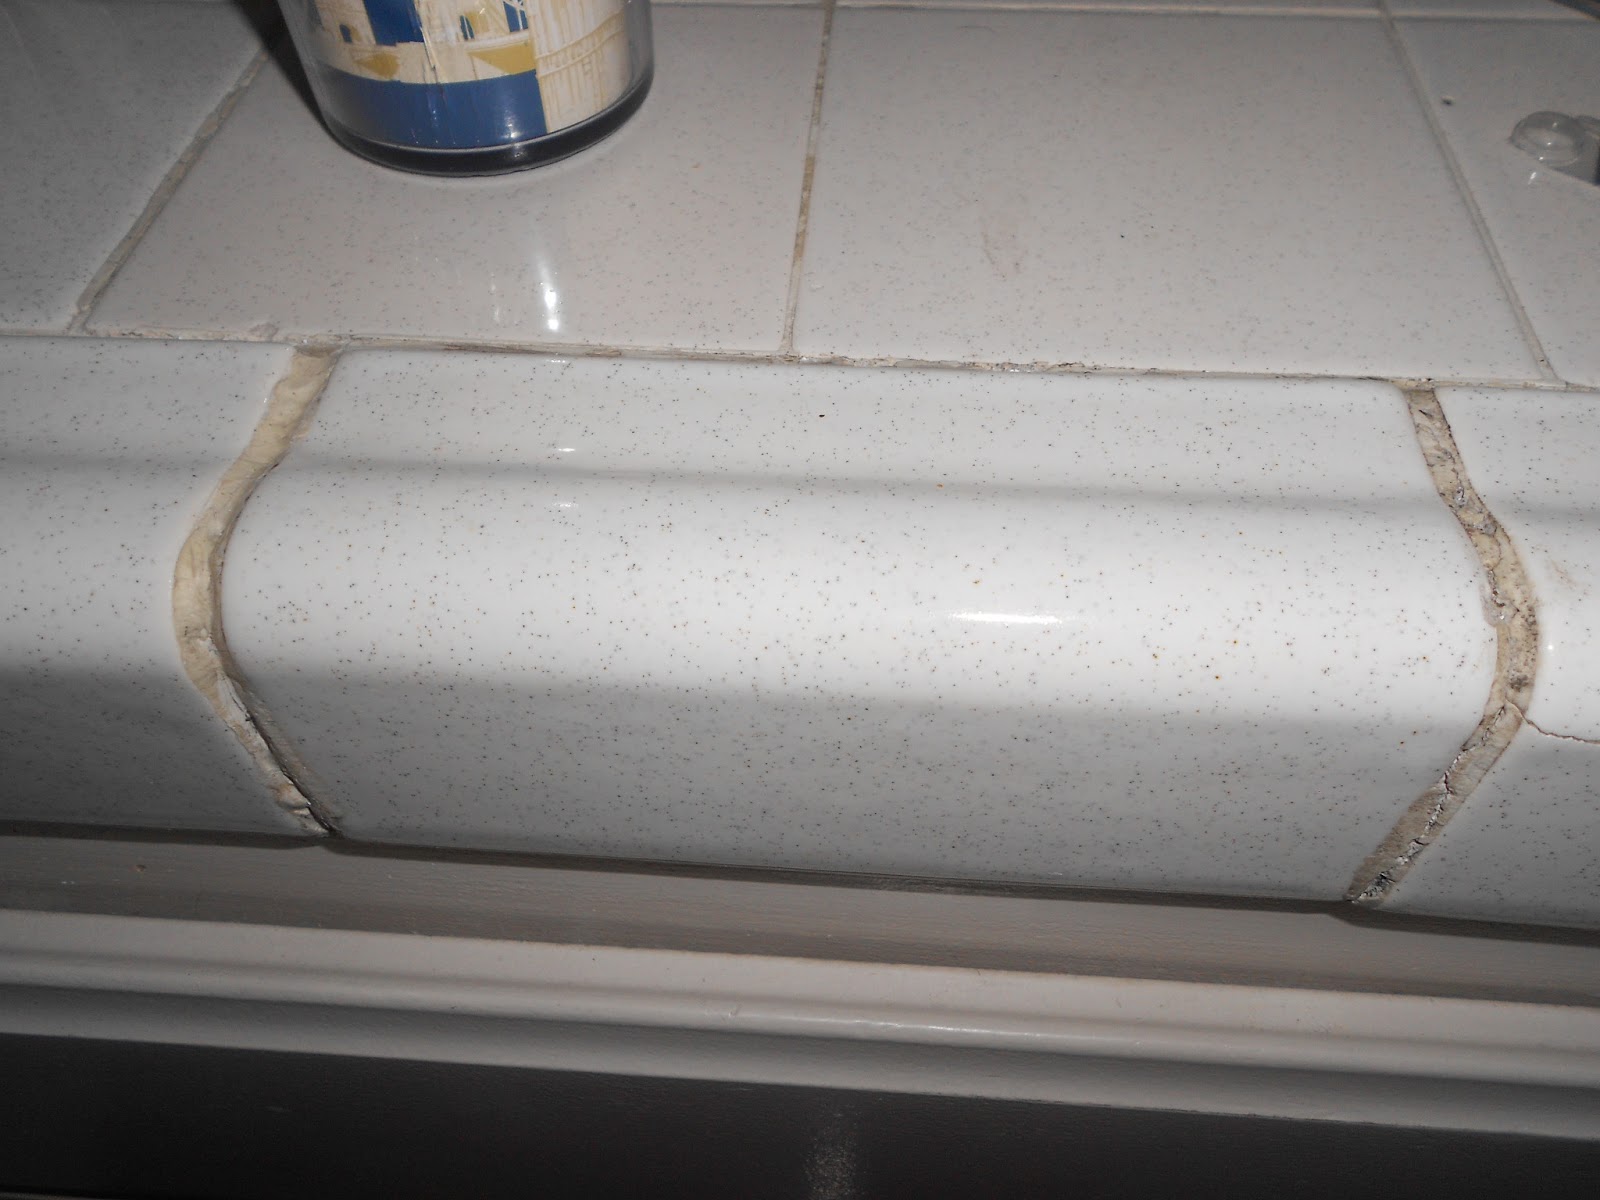
Some "Before" photos are below.  The Grout Rake was great in the wider grooves.
 Below is the Keracolor U Unsanded grout made into a paste and spread into the open area of the groove.  Once the groove is filled in, I let it sit for a little while and then wiped the excess off with a damp sponge

Honestly, when it was done.....it made the kitchen and bathrooms look like they were newly painted...just freshened up so nicely! 
 Photos are below.......

All done and so happy with the finished look!


Monday, May 13, 2013

Project Yesu Pillowcase Dresses

I saw the beautiful pillowcase dresses that Charlene of Pinch of Joy had sewed for a cause.....Project Yesu.

I was very inspired and excited to participate in this wonderful project that provides these dresses for girls in Uganda.

I used tutorials from Sew Like My Mom and from Pinch of Joy to make the dresses.

My friend Liz came over this past Thursday and we managed to get 4 finished.  I had leftover fabric and on Saturday pieced together 3 more dresses.  I am still finishing one of them today.

I have seen the pillowcase dresses on blogs but had no idea how fun and easy they are to make until sewing them for this project.  It was a joy to use this fabric that had been in the fabric basket for several years.  The ribbon bows flattered the fabric, adding just the right amount of cheerfulness to the dresses.
 Beautiful Liz, we have such a grand time, visiting and laughing a lot.


Below is a photo of the two pieced together dresses with only one to finish.  Their color looks faded, but that is due to the "photographer" not the fabric:)

There is still time for these cute dresses to be made and sent to Project Yesu.  They must arrive to Mallory who started Project Yesu by May 28, 2013

Completing this project reminds me of a lady I met once who sewed muslin dresses similar to these every day to send to girls in Mexico.  I would think about her and hoped to do what she did some day.  She lived in a house painted pink that was made fun of by her neighbors.
Little did they know the lady who loved to give resided in that lovely pink house.

Pretty Pillowcase Dresses for Pretty Girls

Sunday, May 5, 2013

Pretty Paper Butterfly

One afternoon my granddaughter Corey who is 10 years old had a friend over.  We decided to make a craft and I had seen this one on a post on my daughter Jessica's blog SunnyStitching.  It is the pattern for the butterfly that is part of the Easter Garden.  The original pattern is on here.

We gathered our supplies and began making pretty butterflies.  A magazine, and templates cut out using the pattern here.  A bit of ribbon, beads and glue. 


Corey chose the page advertising gum, and her friend chose the page advertising chocolate.  I chose a page not pictured. 
We put the butterfly templates on the magazine pages and cut them out.  We then folded it according to the instructions, tied them with ribbon, and then glued beads on the ends of the ribbon and sparkely sequins on the wings.

They were so fun to make and were so pretty.  I think I will put mine on the front of a blank card to send to a friend.
 Three pretty butterflies.

This butterfly will be put on the front of a blank card.

Creating pretty butterflies is a wonderful craft for kids........and me.

Friday, April 19, 2013

Brandy's New Bed

Our sweet dog Brandy has been using the same bed for many years.  We agreed to take in Brandy about 2 1/2 years ago.  She belonged to Jerry's dad who was no longer able to take care of her.  So when we "inherited" Brandy, we "inherited" the bed.

When I bathe Brandy,  I usually wash the bed cover.  I wanted to make another cover so there could be one on the bed when the other was in the wash.

I recycled the fuzzy material that had been the covers for doggy steps that Brandy did not use.  I used the existing dogbed cover as a pattern and some denim scraps for the bottom piece.  I had to piece together the fuzzy fabric and the denim but the end result was fantastic!
 Two pieces of fuzzy fabric that covered the two doggy steps
Original Dogbed Cover

 Measuring for pattern for fuzzy piece that goes around inner edge of bed.
 Measuring along seam for how long to cut the very bottom piece (denim piece of fabric)

 Sewed the two pieces of the fabric that covered the steps together.
 Preparing to cut the piece of fuzzy fabric that goes on the inside bottom of the dogbed cover.
 Analyzing again before cutting the denim piece.
 Denim Fabric pieced together.
 All the pieces sewed together and the elastic put through casing hem that goes around the bottom of the dogbed.

 Picture of the finished dogbed cover. The furry pieces were actually different colors so I balanced them on each side of the cover

Brandy actually stepped right into the bed after I put the cover on to pin the elastic on the bottom piece where it wraps around and gathers.


Brandy just laid down and relaxed!

Oh......to slumber land she goes......

Thursday, April 18, 2013

Fun Easter Week

Henry and Corey had off last week for Easter.  They got to come over several days.

One of the days, Henry, Corey and I made English Muffin Pizzas.....yummy!
English Muffins, Grated Jack Cheese, Pizza Sauce and Pepperoni Slices!
Corey and Henry.....just a little excited to have lunch!

Another day, Henry had a friend come over and play.  So......while the boys played, the girls made Chocolate Chip Muffins and Cucumber-Lemon Water.


Later that day, Corey made a bag for her new marble collection.  She sketched the design she wanted to draw with a permanent marker on the red piece of fabric.  She sewed the red piece of fabric on one piece of the two pieces of dark grey fabric that would be the bag.  She added beads to the cords.......
She loves the PI symbol and added a "c" for her name


What a cool artistic bag she made!

Her Favorite Marbles!

A Wonderful Week