Saturday, July 28, 2012

Olympics Opening Ceremony Dinner

My friend came over to watch the Olympic Opening Ceremonies last night.  I was thinking about what to make for dinner and "taco salad" came into my mind.  I haven't made taco salad in a very long time.  I found a recipe on food.com that used most of the same ingredients I remembered having used and was so excited to make it.  I used less that 1/4 of the package of taco seasoning so the meat would not be very spicy and used Italian Dressing instead of Catalina. .......side dishes to add to salad were chopped avacados and black olives. 

I made iced green tea and added the U.S. and British Flags to the table "decor"....

 
The salad was delicious and we had a lovely evening.....

P.S.  Dessert was a trip to Velvet Yogurt  (the best frozen yogurt in San Clemente)  to bring some delicious frozen yogurt home to eat later:):)

Sharing an evening with a friend is a precious time.

Pink Succulent Flowers - Photo of the Week

I had been enjoying looking at these succulent flowers when walking back and forth into our home.  Hope you enjoy them!

Another picture of the plant below.

Monday, July 23, 2012

Endless Summer Photos - 52 Week Photo Project

Wow......time has flown.....I am really behind in my commitment to taking a photo a week and posting it.  I need 18 to catch up!!! I am going to post a few and hopefully be caught up by the end of the week.  The theme for these photos is our Endless Summer.  It was such a fun summer with Jessica (aka SunnyStitching), her husband Chris and her children Evie and Canaan who live in England.  Evie and Canaan got to spend a lot of time with their cousins Henry and Corey who live locally here in San Clemente.  It was Fun, Fun and more fun!
 Cinderella (Evie) and her Knights in Shining Armor (Henry on left and Canaan on right)
 Another cute photo of the Knights and Cinderella.
 Of course, we had to have a snail race.  (Easy ... Catch snails, wet down the concrete, draw the circle and watch them go!!!!  Of course it is more fun if you root for them!
 A concert by the Talented Three....Canaan on the drum pan; Henry on the tamborine; Evie on the harmonica.  (Can you tell she loved the cinderella dress....also, take a look at the post for Canaan's jubliee trousers made by Jessica on her Sunnystitching blog)
 Canaan decided on his own to read a book he found in my bedroom!...So cute.
 Annual visit to Sawdust Festival in Laguna Beach for the kids to make a ceramic...Corey is above.
 Henry is making his pot with the instructor.  The kids actually get to help make it while the wheel is going.
 Canaan is paying close attention to his instructor.
 Evie loves her pot she is making this year.
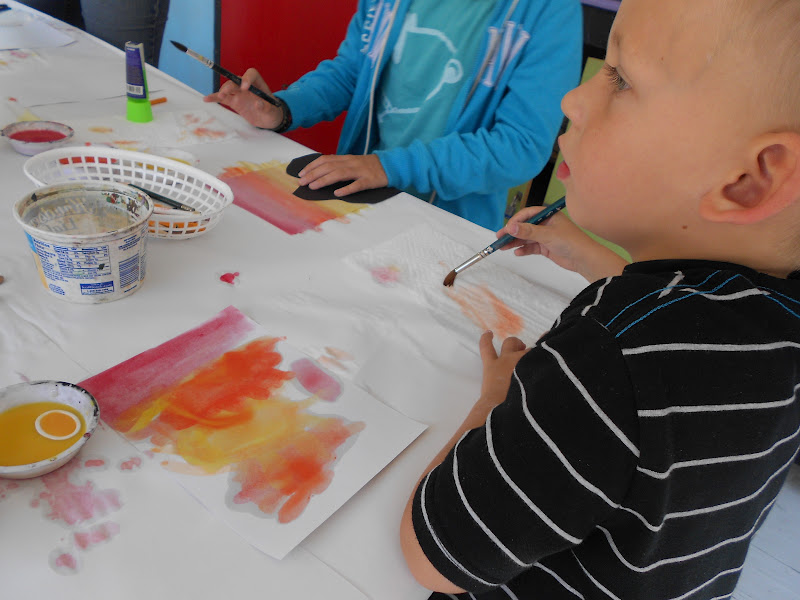
 Canaan is painting a sunset picture at another booth at the Sawdust Festival.
 Henry is also painting his sunset picture.
 Evie is finishing her sunset picture.
 Jessica and I made name surfboards for each child (also our neighbor Lily) and also garden Surf's Up signs. 
 Brandy is dressed up to be a Fairy Princess Dog.
 The Knights and Queen are going to check out the "castle".
Queen Corey makes an regal appearance.

Thank you and hope you had "Fun" enjoying these Endless Summer photos.

Monday, June 25, 2012

Featured on Threading My Way

What a delight for the Knights in Shining Armor pretend dress up outfits I made for each of my grandsons to be featured on Threading My Way.

Pam, thank you so much.  Threading My Way is such a great linky party.  Pam chooses weekly categories so if you ever need ideas, it is easy to find them on her site.


 Henry in his Shining Armor!
Sir Canaan in his Shining Armor leading the way to the castle!

Thank you again Pam for this honor.

Easy Garden Containers

Jerry has been really working hard in our garden.  He started a lot of the vegetables as seeds.  We purchased some of the seeds last year and we bought a few more this year. I didn't take pictures of the seed pots, but they are the six pack containers that plant stores sell plants in.  Our local nursery Shore Gardens will give them away if they have empty ones.

Then he transplanted them as they grew in some pots that were a little larger.  As they grew even larger and needed to be transplanted in the actual garden, we did not have enough space.  Below is a picture of some of these containers with the transplants in them.
So, we considered him building planters with wood our neighbor was going to throw away, but it was the end of the school year of teaching for Jerry and he had a lot of paper work to do.  So.....we got the two empty plastic storage containers from the garage.  Jerry drilled holes in the bottom of the containers, filled them with organice potting soil and planted the starter plants.  He added the wood under the containers for drainage.  So far they seem to be working really well!!!! and the plants seem happy.
Jerry uses the following vegetable food that we purchase at Shore Gardens.  Our garden has grown very well using this food.
Of course, our two trustworthy helpers, our grandsons Henry and Canaan were so happy to help their Papa Jerry with the transplanting, feeding and watering. 
We love them both being together this summer. 
Why try to explain miracles to your kids when you can just have them plant a garden.  

Thursday, June 21, 2012

Feature, Favorite and Most Viewed-Cinderella Dress

Well, I didn't expect so many nice comments on the Cinderella Dress post.  I sincerely want to thank everyone who viewed it.

The linky party hosted by Rachel called Terrific Tuesdays is one of the first linky parties I particpated in.  I want to thank Rachel for hosting it.  The Cinderella Dress was the most viewed on her party....Thanks again everyone!
Next,  as I was catching up on reading emails, I received a nice comment on the Cinderella Dress from Alexis who is the host of another very nice linky party We Like to Learn As We Go.  She featured the dress on her party and I was so thrilled.....thank you so much Alexis.

Then I was linking to the current week Anything Goes link party, and there was the Cinderella Dress featured as one of the favorites of the hostess.  Thank you so much.....All this was very unexpected.
 
As a sidenote,  I made this dress for my granddaughter Evie who lives in England.  Her mom is my daughter Jessica who has the most creative and beautiful Sunny Stitching blog.  Their family arrived this past Thursday and Evie has worn it every day much to my delight!  

Thank you....Thank you.....Thank you...........to everyone

Wednesday, June 13, 2012

How to Make Worm Compost Bin

About 3 years ago, Jerry and I decided we wanted to compost the vegetables, fruits, etc., rather than throw them in the garbage.  We did some research on the internet and it was quite confusing.  Then as we were shopping at our local Farmer's Market that is in our town on Sundays, we noticed a little table with a "worm" sign.  The worm lady, Ruth sold us a bin with dirt and worms in it and told us what to do.  She made it so simple.

At one time we had three of them but have gone back down to two.  It is easy to make one and I hope we show it to be easy in the steps below.
Supplies above:  Plastic bin (these can be purchased at stores like Target, etc for about $4.00).
                           Drill
                           Shredded Newspaper or Newspaper torn into 1 inch strips (Black and White Print is better than Color Print Paper)
                            Dirt with worms in it (plastic bag)

Drill holes in the bottom, on the sides (about one inch down from the top edge), and also around the plastic top that closes the bin.  The holes let air in and keep it from being smelly.
I am holding some of the worms for you to see. We think they are called Ruby Red Worms but a local plant nursery would know which ones work in compost.  I grew up fishing using worms as bait so holding them doesn't bother me:):)
 Next, put some shredded or torn newspaper on the bottom (just make sure holes were drilled in the bottom of the bin first) and wet it down.
Now you can put in the dirt that the worms came in.  If you bought just worms add loose dirt from your garden.
The fun is just starting!   Now, take your compost and put it on top of the dirt/worms. This is our fabulous compost bucket that we keep in the kitchen......I got it for free!!!!! from our neighbor as it was missing a screw.  I was so excited.  However, before we got this one, we used a plastic coffee container. For a dedicated worm bin, please do not add meat, dairy, fish, citrus, nuts/nutbutter or grains as compost.  Eggshells, coffee and used tea bags (as long as no lemon in the tea) are also great to add along with the vegetables and fruit. I am not sure about onions....I do not use them but there is probably info online about adding them.
This picture above shows Jerry pouring the compost on top of the dirt/worms.
Above is view of a layer of the compost on top of the dirt and worms.  You can see the holes that were drilled in the sides and along the top edge.

Jerry is shoveling dirt above from our little garden area to put on top of the compost...as shown below. 
 He is using his hand to take it off the shovel and spread it around.
Next is the layer of newspaper.  Either shredded or torn into strips is ok to use.  Just need to cover completely.
You can basically put the worm bin on top of a table or in a dirt area.  It is best if it is elevated so the liquid (sometimes called the worm tea) can be collected in a container; or on top of a dirt area and the tea will nourish that area it sits above.  Jerry elevated ours on top of the stone and the wood under our lemon tree.

 Now it is time to sprinkle water on the newspaper to dampen it.  It is importan to keep the layers moist as the worms could die if it is too dry.  Now put the top on the bin making sure holes were drilled in the top.
Worm Bin Finished and placed under the Lemon Tree by my great gardener!!!!!!
Continue adding your compost/dirt/newspaper/dampen with water  and soon the bin will be full of rich soil.
**It is important to not make the layers too thick.  If you have a lot of compost, just make more bins.    **This allows the worms to have time to eat the layers steadily.
**The Worm Bin should be in a shaded/sun area.  It needs to stay moist.

Composting, along with recycling paper, glass, metal has really reduced the garbage for our household

Feed the worms and they will return to you  dark beautiful soil for your garden.